 Looking to reduce workload, reduce marking, provide quality feedback and improve your wellbeing?
The Department for Education have made a commitment to reduce to workload and have challenged the tech industry to bring education to life and slash the time teachers spend on burdensome administrative tasks. The purpose of this blog is to give educators an insight into how they can work smarter, reduce your workload using tech that is free and readily available to you.
There are 8 videos approx 60-120 second videos that use simple but effective tools using technology to reduce workload and save time marking in the classroom or at home. If you have limited access to technology there is a top tip using pen and paper. Each tip has been given an overall rating combing ease of use, time to set up and impact.
Tip 1 – Use Kaizena to provide audio feedback
See how you can provide audio feedback using Kaizena. All you need is a device with a built in microphone, a headset or even your hands free kit that comes with your phone will do.
Pros: Easy to use, free, can be done on the go, can be used on any device where you download the app, can be quicker and faster to use than google voice, as you do not have to amend errors. Students can play back the audio as often as they like.
Considerations: If you have a cold, your voice may sound muffled, be mindful if you have children that they are not shouting in the background!
Uses: Marking, audio feedback, letters, minutes, reports, anything which involves giving feedback.
Impact:![]()

Tip 2 – Set up preferences to suit you
See how you can create shortcuts within preferences,on Google docs to apply a marking policy or general comments when providing feedback. Create shortcuts that work for you.
Pros: Easy to set up, create as many shortcuts as you want, create consistency across a department or whole school marking policy.
Considerations: You need to use ‘suggesting’ mode to apply this, check mark could be easier to use than this.
Uses: Feedback, shortcuts, apply marking policy, make suggestion
Impact: ![]()
Tip 3 – Use Google classroom to get your evenings and weekends back
This update is AMAZING. Use the in built comment bank in Google classroom to breeze through marking. Challenge yourself a target to mark a class set of work in under 20 minutes!
Pros: Easy to use, speeds up marking, use preloaded comments with the hash symbol (#), alternate projects through a click, keep building your comment bank, current comment banks can be easily pasted in.
Considerations: Use different conventions/symbols to differentiate between different comment banks.Students will need a unique code to join classroom unless you are already using G Suite with group already setup.
Impact: ![]()

Tip 4 – Dictate the way you mark with Google Voice
See how you can dictate feedback using Google Voice, all you need is a device with a built in microphone, a headset or even your hands free kit that comes with your phone will do.
Pros: Very accurate, easy to use, can be done on the go, can be used on any device, no special software required.
Considerations: Can miss out key punctuation. If you are perfectionist, you may need more than a couple of takes.
Potential uses: Marking, feedback, letters, minutes, reports, anything which involves typing!
Impact: ![]()
Tip 5 – Leave multiple comments with the Feedback Sheet add-on
The feedback sheet is an easy way to leave multiple comments through a couple of clicks and record feedback students on their work and on a sheet to allow teachers to track what they have done.
Pros: Easy to use, free, provide multiple copies, records centralised feedback on a Google sheet. Once you have setup the system it saves lots of time marking.
Considerations: You have to invest time in building comments and setting up the spreadsheet.
Uses: Marking, providing feedback, witness statements
Impact: ![]()
Tip 6 – Click your way to leaving feedback with Checkmark
Check mark a really simple chrome extension allows you to improve literacy by applying a marking policy, providing short and sharp feedback centred around SPaG (Spelling and Grammar)
Pros: Very easy to use, free, provide instant feedback in a couple of clicks, the shortcuts are editable.
Considerations: Ensure the abbreviations match your marking policy
Uses: Marking, providing feedback.
Impact: ![]()
Tip 7 – Screencast video feedback
See how you can screencast video feedback using Screencastify (free), all you need is a device with a built in microphone, a headset or even your hands free kit that comes with your phone will do.
Pros: Easy to use, you can add expression to feedback to show when you are happy, disappointed or frustrated. You can provide more in depth feedback, it is is the same as being sat next to a student giving feedback, except students can play back the feedback over and over again. Once you get use to the software it can be very powerful. The software is free to use
Considerations: You get 50 videos a month, to get unlimited you need to upgrade to a premium account, if you are perfectionist, you may need more than a couple of takes. You need to use the chrome browser, don’t have screaming children in the background when you are recording!
Potential uses: Marking, feedback, flipped learning.
Impact: ![]()
Tip 8 – Use Google Keep as a comment bank
Google keep has a wide variety of uses, this video shows how you can use a comment bank on the same screen to speed up your marking process.
(Please note since creating the video, to open Google Keep can now be opened on the panel on the right hand side, rather than through the tools menu)
Pros: Easy to use, free, notes can be shared to increase the collaborators, can be downloaded on any device where you download the app.
Considerations: You have to invest time in building comments. Google classroom is an even quicker way of using a comment bank.
Uses: Marking, note taking, screenshots, photos of work, photos of the whiteboard, checklists.
Impact: ![]()
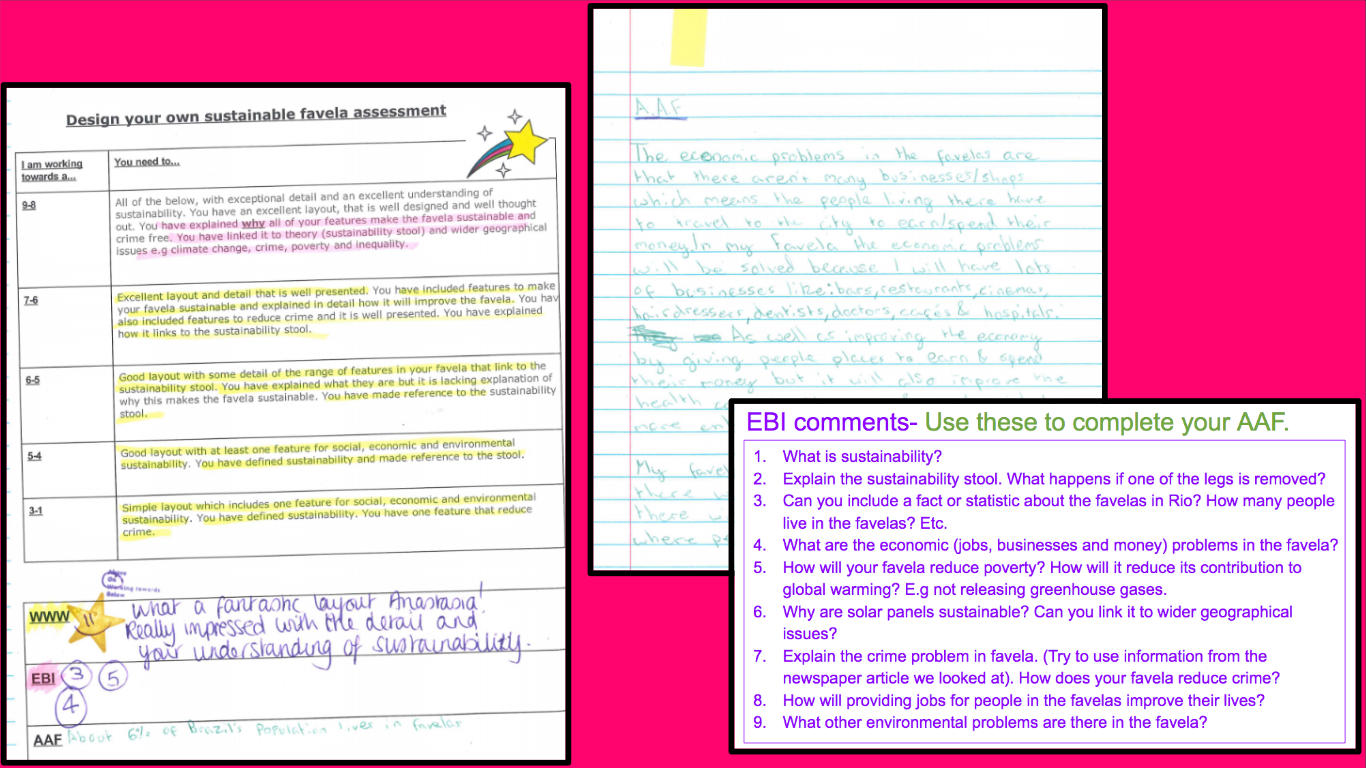
Tip 8+1 – Create an assessment template
Here we see a great example of how you can quickly assess a piece of work using an assessment feedback sheet with the use of a key, whilst providing meaningful and detailed feedback to students.
Steps
- Teachers create a preloaded set of numbered EBIs (Even Better If) on a slide.
- Create a feedback sheet with assessment criteria.
- Highlight with a marker what went well, what can be improved (referring to the assessment criteria).
- Write out your specific WWW (What Went Well). This can also be created with a preloaded set WWW to save even more time (see point 1).
- Number the EBIs that are specific to the work you are assessing. AAF (Action After Feedback) is student acting upon their EBI.
Pros: No tech required, easy to use, easy to create, easy to link to PLCs and assessment criteria.
Considerations: You have to invest time creating the templates, not as environmentally friendly, students need training to understand how to address the EBIs (Even Better If).
Uses: Marking, feedback, assessment.
Impact: ![]()
Written by Harmeet Sahota, Senior Assistant Headteacher and Google Certified Trainer.
Last updated Nov 23rd 2018
Really useful thanks, I have shared this with staff at work and some are using Kaizena and Screencastify